Okay, there, I said it. I don't like pie. Well more specifically, I don't like cooked fruit pies. But that's really what we think of when we think of pie right? Apple pie, cherry pie, blueberry pie? No thank you. I will make an exception every now and again for a fresh strawberry pie, but that's even pushing my pie-tolerating limits. I know it's un-American, un-fathomable even. Really when it comes down to it, I am just not a big fan of cooked fruit in any form, which by default, rules out pie.
I also have an issue with the crust to filling ratio in pies, which is why I prefer tarts, but that category of neurosis is better left to another post.
That being said, I do, however, LOVE pie crust. You know what else I love? Caramel. Chewy, salty caramel is the food of the gods right? I am pretty sure we learned that in Greek Mythology 101 in college. I may be getting my bachelors degree and my pastry degree mixed up, but it has to be correct.

So, long story short, I had an extra disc of my favorite pie crust just hanging out in my freezer, as I am sure most of us do (kidding), and it was just begging to be made into something delicious. Taking inspiration from one of my favorite blogs, Sprinkle Bakes, these bad boys were born. I must confess that these pictures were from last fall, I just haven't gotten around to posting them until now. That will explain the secret and oh so delicious ingredient, apple cider.
To sum things up, pie crust + apple cider caramel + sea salt = amazingness. I rolled out my pie crust and fit it into the bottom of a square cake pan, and baked it until beautifully golden brown. Topped with a chewy caramel and flaked with crunchy sea salt, these squares are satisfying and decadent, any time of year.
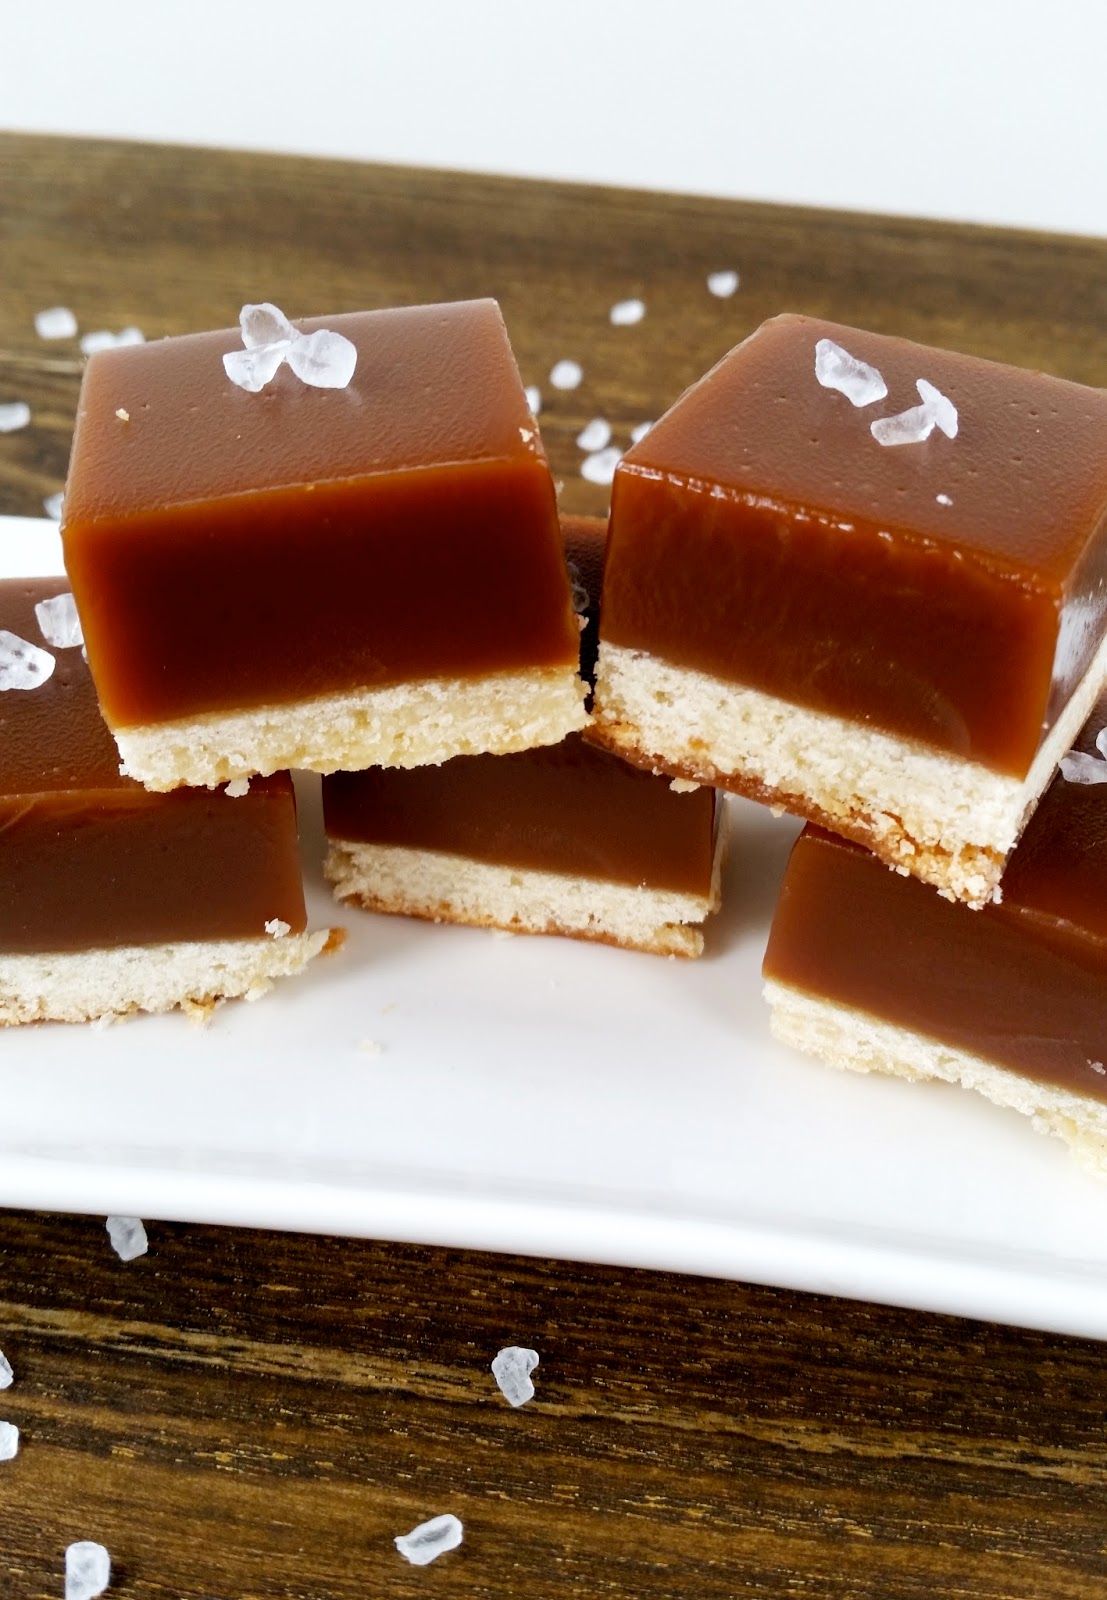
Apple Cider Caramel Squares
Makes 64 1 1/2 x 1 1/2 inch squares
Pate Brisee Crust
400 grams (14 oz) unsalted butter, chilled, cut into 1/2 inch cubes
1 tablespoon white distilled vinegar
100 grams (3 1/2 oz) granulated sugar
2/3 cup water, chilled
665 grams (1 lb 7 1/2 oz) all purpose flour1 teaspoon salt
Remove butter from fridge 20 minutes before mixing.
In a small bowl, combine sugar, water, and vinegar, stir to aid the dissolving of the sugar. Set aside in refrigerator for 10 minutes. Then, stir again to completely dissolve sugar.
In a food processor, pulse the flour and salt together a few times to combine. Add the butter, and pulse in one second bursts about 3-4 times until butter is cut in and evenly dispersed. You should have visible chunks of butter in your flour mixture, this is where the flakiness comes from.
Pour mixture into a large bowl and make a little well in the middle of the flour. Pour the vinegar water mixture into the well, along with the almond extract, and gently mix liquids into the flour with a fork. When liquid is evenly dispersed, dump dough out onto a clean surface and knead gently a few times, just until dough comes together in one cohesive ball. It may be a bit shaggy or falling apart, but that's okay, while it is resting the moisture will bind everything together.
Cut ball of dough in half and shape each half into a disc about 1/2 - 3/4 inch thick. (use one for this recipe, and you can freeze the other half for later use) Wrap in plastic wrap and chill for at least two hours, or overnight. Take dough out of fridge about 10 minutes before you roll it out. Place one of your discs of dough between two sheets of parchment paper and roll out to a 1/8 inch flat disc. Always start in the center of the disc and roll outward, turning the disc 30 degrees after each roll to get an even thickness throughout.
If you are using a square or rectangular pan, you will want to roll out your dough to fit your pan instead of a round circle. Line your cake pan neatly with parchment paper, so that the paper extends up the sides of the pan, this will aid in removing the bars once the caramel is poured in. Pan spray under the parchment will help keep it in place. Carefully move the dough to your pan and cut off excess. For this recipe I just cover the bottom of the cake pan, and just about 1/4 inch up the sides to catch the caramel.
Dock with a fork (meaning poke a bunch of tiny holes in the bottom of the tart crust with a fork) and freeze for twenty minutes. Preheat your oven to 400 F. Place a piece of tin foil over your tart shell, pressing it down to fit the form of your tart, and fill with beans or rice or pie weights. Blind bake your tart for 20 minutes, flipping the pan front to back halfway through. Remove the pie weights and tin foil and bake for another 5-7 minutes, until the crust is golden brown and cooked completely. Let cool while you make the caramel.
Chewy Apple Cider Caramel
1 - 1/2 gallon apple juice
2 1/4 cups granulated sugar
1/4 cup water
2 cups heavy cream
8 oz. butter
2 tsp. salt
Over medium-low heat, reduce apple cider to 1/2 cup. Be sure to keep a close eye on it when it gets close to being done, it will basically turn to caramel and can scorch quickly. Let cool.
In a small saucepan heat the cream and butter until butter is melted, then set aside and keep warm over very low heat.
In a large saucepan, combine the sugar and water, making sure all the sugar is evenly wet and that the sides of your pan are clean and free from sugar. Cook over high heat until caramelized to a dark amber color. Do not stir. When sugar reaches the color you want (I prefer a dark caramel, but a lighter color is fine also), carefully whisk in the heavy cream/butter mixture one ladle-ful at a time. Insert a candy thermometer and cook caramel, whisking constantly until it reaches soft ball stage (238 degrees F). Quickly whisk in the cider reduction and pour over prepared crust. Let caramel cool at room temp for at least an hour, then transfer to refrigerator to chill completely.
Once chilled, gently remove from pan by pulling up on your parchment and transfer to a cutting board. Cut into 1 1/2 inch by 1 1/2 inch squares and top with sea salt.